When you publish a post through Blogger not only does the post appear on your blog but Blogger also inserts the content into two news feeds (RSS and Atom formats) which people can subscribe to in order to know when you have published something new. These feeds are also used to fill in the blog list widget that many people include in their blog template; you can see mine under the heading "I'm Also..." on the right.
If you have included an image in your post, and the image is hosted by Blogger (i.e. has
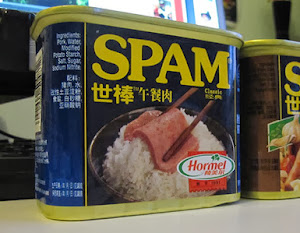
blogspot in the URL) then as well as putting the post content into the news feed Blogger will generate a small thumbnail to represent the post. It appears to do this by creating a 72 pixel square thumbnail from the first image in the post. Specifically it scales the image so that the short edge is 72 pixels long and then crops the other dimension to retain the middle of the image. You can see this working with the image of a Chinese tin of spam from one of my recent posts.

To make the images easier to see I've used a width of the 300 pixels instead of 72 but the result is the same. On the left you can see the original image sized to 300 pixels wide, whereas on the right we have a 300 pixel thumbnail generated by scaling the height first and then cropping the width. In this example the cropping isn't too bad as it has retained almost all of the important content, but you can easily imagine images where the cropping could result in thumbnails that were far from ideal; chopping off peoples heads is a common example.
Fortunately it is easy to control the thumbnail that is generated by ensuring that the first image in your post is already square and cropped to your satisfaction. Now of course that would often leave you with an image you don't actually want to use, but that is alright as my trick doesn't actually result in the image appearing in the post anyway.
To customize the thumbnail all you have to do is upload the square image you want to use (it can be any size although as it will always be displayed as a 72 pixel square there isn't much point making it too big) through the Blogger interface and then switch to the HTML editor view. Now we don't need all the HTML that Blogger generates as all we need is the
img tag. So you can remove everything surround the image and move the rest to the very beginning of your post. So for this post that looks something like (I've trimmed the URL to fit the screen):<img src="http://3.bp.blogspot.com/.../thumnail.jpeg" />By placing this at the beginning of the post we ensure that this image is the one Blogger uses when it generates the thumbnail, and we can hide it for all other purposes by adding some CSS to the image as follows:
<img style="display:none;" src="http://3.bp.blogspot.com/.../thumnail.jpeg" />In this case the CSS is fairly self-explanatory as it simply turns off the display of the image. And that is it, a very simple trick but one that can make your blog look better in other peoples news feeds.
As well as using this to customize a thumbnail that Blogger would already generate you can of course use it to generate thumbnails in cases where Blogger otherwise wouldn't. The two main cases where this might be useful are firstly where you host your images somewhere else (maybe flicker) or, and this is where I most often use this trick, if you have embedded a YouTube video instead of an image in your post. In neither case does Blogger generate a thumbnail for you, but you should be able to see how easy it would be to add your own.
 SUBVERSION
 GITHUB
 JENKINS
 DEMOS
DEMOS Now before you all get confused this isn't a post about health or beauty tips for your thumbnails, but rather about a little trick I sometimes use to improve the thumbnails Blogger generates for each post.
Thanks Mark, I have book marked this and will have a play soon.
ReplyDeleteHopefully the instructions are clear enough, but if you get stuck give me a shout.
Delete